Getting started is the hardest part, but once the basic stitch is mastered, the rest will be smooth crocheting. You’ll be ready to move onto more complicated stitches before you know it.
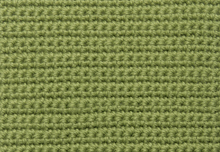
SINGLE CROCHET
The first row of any crochet stitch is the hardest. This is because you don’t have a lot to hold on to, so it’s always going to be a bit clumsy. Take it slow. Keep in mind that once you’ve completed the first row, the rest will go much easier.
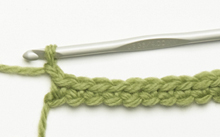
To begin your first row of single crochet, make a foundation chain that has eleven chain stitches. Hold the yarn and crochet hook as before. Now hold the foundation chain so the top is facing you and your thumb and middle finger are holding the 3rd chain stitch from the hook. For the easiest maneuvering to go into a chain stitch, slide your thumb from the grip up to the throat of the hook, then anchor the loop on the hook with your thumb.
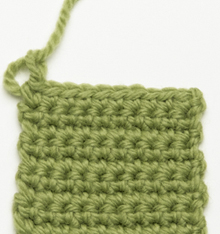
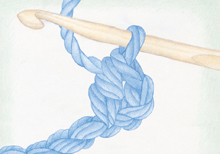
single crochet
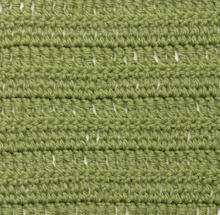
Single crochet swatch
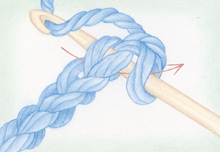
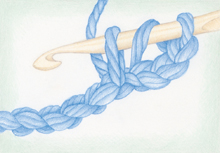
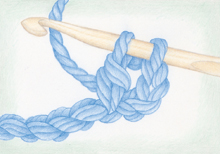
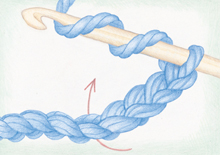
1. Insert the hook under both the front and back loops of the 2nd chain from the hook. (You can also use your other thumb to help it along.) Wrap the yarn over the hook from the back to the front (this is called a yarn over), then catch it with the hook. Now draw the hook through the two chain stitch loops. You now have two loops on the hook.
2. Wrap the yarn over the hook from the back to the front (yarn over), then draw the yarn over through both loops on the hook.
3. You have now completed one single crochet stitch. Continue to repeat Steps 1 and 2 nine more times, inserting the hook into each chain stitch across. You now have ten single crochet stitches completed across the row.
4. To proceed to the next row, make one chain stitch (this is the turning chain), then turn the piece from the right to the left; this step is called chain and turn. Remember that one chain stitch equals the height of the single crochet stitch and that you will always turn the piece from the right to the left. To begin the next row, insert the hook under both the front and back loops of the first stitch (skipping the one turning chain stitch). Continue to repeat the steps until you have completed ten rows of single crochet.
Fastening Off
When you have completed the number of rows called for or have achieved the length measurement stated in a direction, you need to secure the last stitch so the rest of the stitches don’t come undone or unravel. This is called fastening off. Simply cut the yarn coming from the ball about 12″/30.5cm from the loop on the hook. Bring the yarn over the hook, then draw the yarn end (called a tail) all the way through the loop on the hook. Pull the tail to tighten and secure the last stitch.
Half Double Crochet
Now you’re ready to go on to a more complex stitch. To begin your first row of half double crochet, make a foundation chain that has twelve chain stitches.
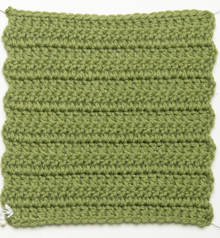
double crochet
Double crochet swatch
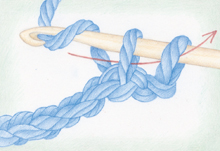
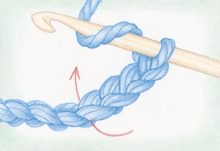
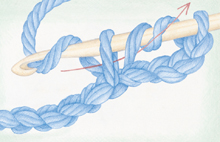
1. Hold the yarn and the crochet hook as before, but for this stitch hold the foundation chain at the 5th chain stitch from the hook. Yarn over the hook from the back to the front. Insert the hook under both the front and back loops of the 4th chain stitch from the hook.
2. Yarn over the front of the hook and catch the yarn. Now draw the hook through the two chain stitch loops. You now have three loops on the hook.
3. Yarn over the hook from the back to the front. Draw the hook through the first two loops on the hook. You now have two loops remaining on the hook. Yarn over the hook from the back to the front. Draw the hook through both the loops on the hook.
4. You have now completed one double crochet stitch. Continue to repeat Steps 1–3 nine more times. You now have ten double crochet stitches completed across the row. To proceed to the next row, make three chain stitches, then turn. Remember that three chain stitches equal the height of the double crochet. Continue to repeat the steps until you have completed ten rows of double crochet. Fasten off.
TREBLE CROCHET
The treble crochet has one more step to do in order to complete the stitch than a double crochet. Now that you have three crochet stitches under your belt, it’s time to follow slightly abbreviated directions to begin to prepare you for reading project directions. To begin your first row of treble crochet, make a foundation chain that has fourteen chain stitches.
treble crochet
Treble crochet swatch
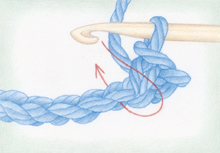
1. Hold the foundation chain at the 6th chain stitch from the hook. Yarn over the hook two times. Insert the hook under the front and back loops of the 5th chain stitch from the hook. Yarn over and draw the hook through. You now have four loops on the hook.
2. Yarn over the hook and draw through the first two loops on the hook. You now have three loops on the hook. Yarn over the hook and draw through the next two loops on the hook. You now have two loops on the hook. Yarn over and draw through both the loops on the hook.
3. You have now completed one treble crochet. Continue to repeat Steps 1 and 2 nine more times. You now have ten treble crochet stitches completed across the row. To proceed to the next row, make four chain stitches and turn. The four chain stitches equal the height of the treble crochet. Continue to repeat the steps until you have completed ten rows. Fasten off.
SLIP STITCH
The slip stitch is an odd little stitch that’s shorter than a single crochet and is more utilitarian than decorative. It’s used for anchoring chain stitches, shaping pieces, making drawstring cords, joining circles (called rounds) when crocheting in the round, securing seams together, finishing edges, and more. Although it is used in some pattern stitches, it is never worked in multiple rows all on its own. To practice making slip stitches, make a foundation chain that has eleven chain stitches.
slip stitch
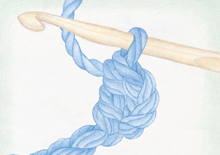
1. Insert the hook under both loops of the 2nd chain from the hook. Yarn over the hook and draw through the chain stitch and then the loop on the hook in one movement. One slip stitch completed.
2. Continue to work one slip stitch in each remaining chain across. See what a nice drawstring or tie a single row of slip stitches makes.
Tip: It’s almost impossible not to get interrupted when making a chain and counting chain stitches. To prevent making an error, write down the number of chain stitches you have to make on a sheet of paper. Chain stitch in increments of ten, making a check mark on the paper for every ten chain stitches. Continue in this manner until you have reached the number required.