Home » Articles » Vogue Knitting Technique: Neckline Details
Special Collars for Special Sweaters
By Deborah Newton
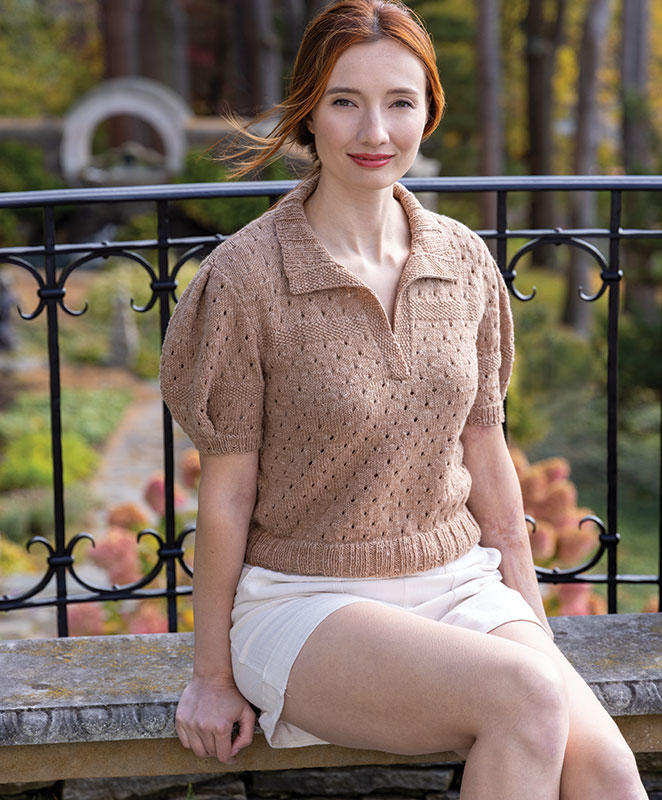
CAMPANULA POLO UPDATE Small eyelets accentuate the main fabric as well as the ribbed edges in this buttonless polo with a flattering collar. Some “now” pleats, top and bottom, create full sleeves for a fashion-forward summer pullover. Seed stitch details provide contrast. DESIGNER: Deborah Newton YARN: Skacel ALB Lino
Adding a decorative collar to your sweater is not much harder than making a ribbed edging. Here are some techniques to help you learn more about adding this special detail to any sweater.
Whether your sweater is a simple pullover, a polo, a button-front cardigan or a flowing lace garment, a collar can add extra visual interest.
There are many kinds of collars: from simple rectangles to those with interesting shapes and patterning. A collar follows the neckline the way a knitted edging does, but it separates into points. Collar edges can meet, overlap or even separate widely! Many collars are deep enough to fold, but they can also be planned to lie flat. Here are some guidelines for planning your collar’s appearance, shape and fit.
Consider Fabric
Classic structured collars work best when they are knitted from a firm non-curling fabric, like ribbing or flat slipped stitch or knit/purl patterns.
In contrast, a collar can also be knit from a drapey loose-textured fabric, like an open lace pattern. A looser collar might emerge from a wider neckline, and might have extra depth to lie across the shoulders, so that the body – not the fabric – provides structure.
Thick fabrics with deep texture, like cables or colorwork, need to be a little deeper, and maybe a little wider at the outer edge, as opposed to collars knitted in flat patterns.
A yarn that has body will hold the shape of a collar that folds over, and create crisp points. A softer yarn will be enhanced by a firmer pattern stitch.
Neckline Preparation
Collars can be attached to close-fitting or wide/deep necklines. Take these tips into account when planning a collar:
A collar edge must measure the same as the neckline edge, including any trim. Use a tape measure, standing on its side, around the neckline of your sweater for accurate measurement.
A collar, like any neckline trim, should not look strained or skimpy. A generous number of stitches will give necessary width and depth to fold well.
If your collar is to be the same as the fabric or ribbing of your sweater, drape the sweater piece on your neckline, to help envision how wide and deep the collar needs to be.
To decide collar shape, I often cut a test shape out of thick machine knit fabric. Then I plan my handknit version according to my gauge.
If your collar stitch pattern is not the same as the sweater, knit a gauge swatch so you can calculate how many stitches are needed.
Joining your Collar
TIP: However your collar is joined to the sweater, make sure your patterning will be correctly aligned when the collar is complete and folded over.
Picking up stitches
The easiest way to join a collar to your sweater is by picking up stitches around the neckline and then knitting.
Magic touch: Note that when you pick up stitches, a ridge is formed on the opposite side of the fabric. Depending on how you pick it up, this ridge can be on the outside of the sweater, or to the inside. Which looks best to you? With my polo (at right), I picked up the front stitches from the wrong side, and the back neck stitches from the right side. When the collar opens, the front ridge is hidden, and the ridge for the back neck disappears inside the sweater.
Sewing on: If your collar is knitted separately, from the outer edge towards the neckline, then it must be sewn on. For the easiest seaming, mark both collar and neckline edges in several equal increments. Match the markers as you sew. Start at the more visible (and tricky) front points and then work each side towards the back.
Sewing option: Sometimes before sewing a collar in place, I work narrow trim around the neckline, usually a garter ridge or reverse stockinette roll. I sew the collar to the inside ridge formed by the picked up sts for a very neat join.
Collar Drama
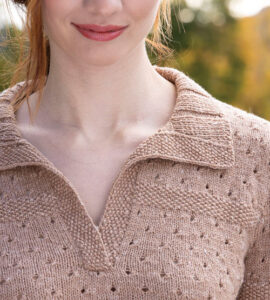
Collar detail of the CAMPANULA POLO, shown on page 29, Vogue Knitting Spring/Summer 2023
To tweak a basic collar for more drama in size and shape, you will need to do more shaping. Larger collars work nicely with panels of patterns so increases or decreases can be worked between them.
To make a collar deeper – more than a classic three to four inches in depth – plan the shaping to fall in more places than just at the outer points so the collar can approach a half-circle in shape.
If you want a collar to lie flat to the shoulders, the collar needs to approach almost a circle in shape. For this shape, it is great to cut out a test collar from fabric first, so you can be sure of the measurements.
Adding a collar to a V-neck or open front sweater? How about adding a simple decorative rectangle to frame the opening of your sweater?
Trying new things!
Next time you start to work a rib at the neckline of a simple pullover, think about how much more detail a collar would add! Refer to other collars in garments you own. Even non-knits can be inspiration for shape and measurements. And knit a swatch to test your collar details!
COLLAR VARIATIONS
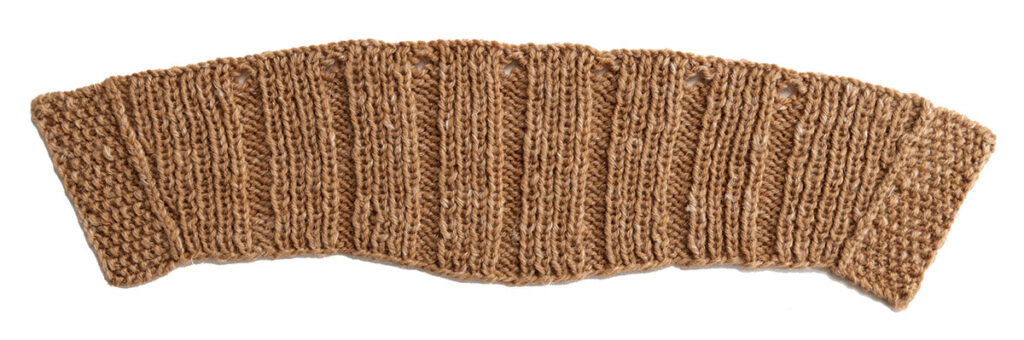
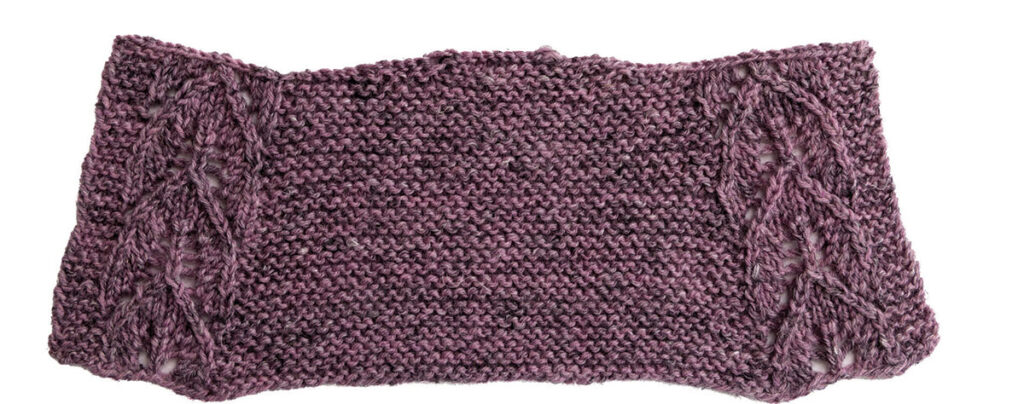
I like to test collar shaping and details by making miniature collar swatches. These here, and my sweater (shown on page 29, Vogue Knitting Spring/Summer 2023), are knitted with sportweight Schoppel ALB Lino yarn (85% virgin wool, 15% linen) – a yarn with body.
Collar #1
is a firmly knit K1, P1 rib rectangle. This simplest collar is a great choice for close-fitting necklines. A generous number of sts are picked up around the neckline, knitted to a length of three inches or more.
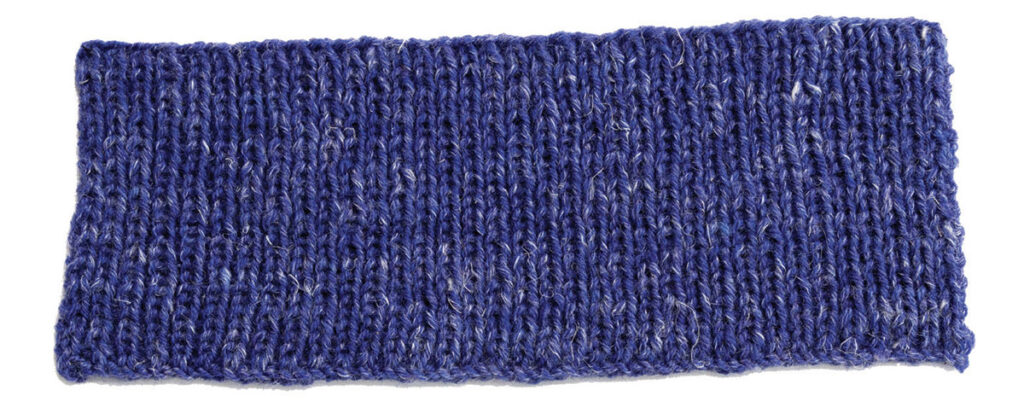
Collar #2
is a softer more detailed K2, P2 rib. Increases are worked (approximately every four rows) at the edges to shape the points so the collar can spread without straining.
Collar #3
is the same as my sweater (at left), in decorative rib, with seed stitch trim picked up from the wrong side on the collar edge. A few short rows worked across the back neck allow the collar to “rise” slightly higher in the back.
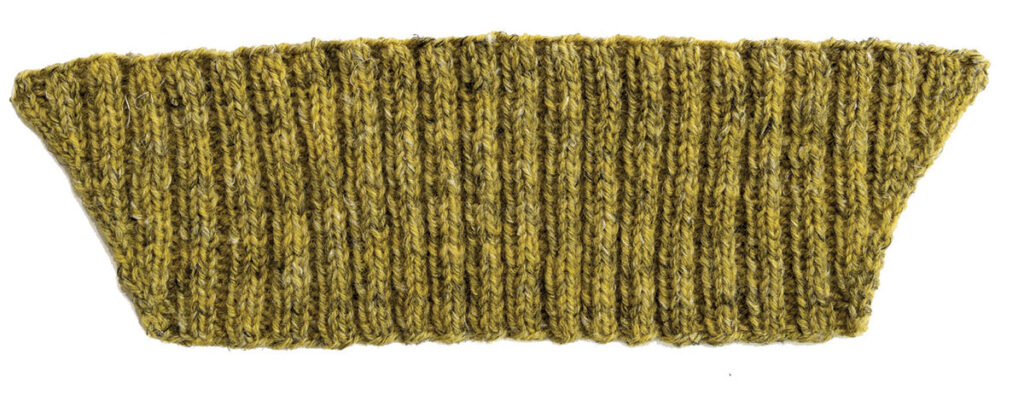
Collar #4
is Garter stitch, knitted in the opposite direction, from outer collar to neckline edge. Patterning is at the tips, which are shaped with decreases. The crescent at the back neck is shaped with bound off sts.
COLLAR CRESCENT
By shaping the base of your collar, you can create a little crescent shape. Do this over the back neck stitches, by either working four to six short rows, or binding off gradually over four rows. This shaping helps the back neck “rise” to drape more gracefully to the front of the sweater. Make sure the back neck of your sweater itself is not shaped, but straight.