TWO-ROW BUTTONHOLE
The two-row buttonhole is the most common way to make a buttonhole. It’s not only easy to do, using techniques you have already learned, it can be made to accommodate just about any size button. It is made by crocheting a number of chain stitches, then skipping the same amount of stitches as were chained. On the following row, the same number of stitches are crocheted into the chain-space as were chained and skipped. Keep in mind that the fewer the number of stitches chained and skipped, the smaller the buttonhole, and vice versa. If you are going to use a button size that’s different than what’s called for, you must first crochet a swatch, using the same pattern stitch that’s used in the directions, and experiment to see how many chain stitches you need to make and skip. To test for size, slide the button through the hole. The width of the buttonhole should be slightly smaller than the width of the button, otherwise the button will not stay buttoned.two-row buttonholes
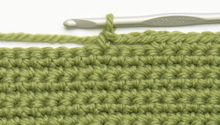
1. Work to the placement marker of the buttonhole (single crochet shown here). Chain three (not too loosely), skip the next three stitches, then continue to work to the end of the row or to the next marker.

2. On the next row, work to the chain-three space. Work three stitches in the space, then continue to work to the end of the row or to the next chain-three space.
BUTTONHOLE SPACING
The first step to perfect spacing and matching up of buttons and buttonholes is to measure and mark the spacing of the buttons. Pattern directions will always tell you where to place the first and last button; but then what? To get your buttons spaced as evenly as possible, start by placing markers on the buttonhole band for the first and last buttons. If there are an odd number of buttons, measure and place a third marker in the center. Measure the distance between these markers, then place evenly spaced markers for the remaining buttons. For speedier and more accurate marking, use straight pins first. They are easiest to position and reposition by even a fraction of an inch. When all your markings are completed, replace the straight pins with more secure safety pins or yarn markers.
Although the two-row buttonhole is made only one way, it will take on two different looks depending on how the buttonhole band is made. When the buttonhole band is made from the bottom up, the buttonhole will be a horizontal slit. When the buttonhole band is crocheted directly onto the front edge of a cardigan’s front, for example, the buttonhole will be a vertical slit. In order for you to evenly match buttons to buttonholes you’ll have to know two different methods of measuring. To make sure your buttons and horizontal buttonholes line up exactly, simply count the number of rows between the lower edge and the first marker, between the first and second markers, etc. Write down how many rows separate each marker, and then make your buttonholes on the corresponding rows of the buttonhole band.
Matching vertical buttonholes to buttons is a little trickier because you have to center the buttonhole on the button. The marker not only indicates the placement of the button but also the center of the buttonhole. If the buttonhole is only one stitch wide, make the buttonhole at the marker. If the buttonhole is two to three stitches wide, begin the buttonhole one stitch before the marker. If the buttonhole is four to five stitches wide, begin the buttonhole two stitches before the marker. Also keep in mind that the number of stitches between the buttonholes should all be the same.
BUTTON LOOPS
Button loops are worked on the right side of the crocheted fabric edge and are usually completed in one row. Typically, the row is worked in single crochet, but the loops are always made of chain stitches. If you are going to give button loops a try, experiment first to see how many chain stitches you’ll need to create a loop that’s big enough for your button but small enough to keep the button in place.
ONE-STEP BUTTON LOOP
These simple loops are usually used for buttoning the shoulders of infants’ and children’s pullovers or the fronts of cardigans. However, when you are working with a thicker yarn, such as chunky or bulky weight, they can be used for adult sweaters as well; finer yarns make flimsy loops for adult-size garments.
one-step button loops
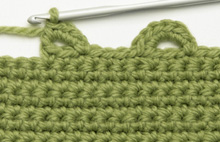
Work to the placement marker of the button loop (single crochet shown here). Crochet the desired number of chain stitches (not too loosely), either don’t skip any stitches or skip one or two, then continue to work to the end of the row or to the next marker.
TWO-STEP BUTTON LOOP
These very sturdy loops are perfect for fastening just about any size or shape button and add a handsome designer detail as well. Make a test swatch to familiarize yourself with this technique. To make custom-sized loops, simply adjust the amount of chain stitches and skipped stitches. After you know how many stitches you must skip, you will then be able to measure and mark for their placement.
two-step button loops
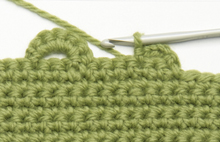
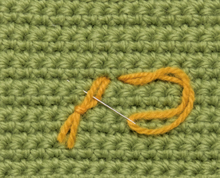
1. Work in single crochet for about ten stitches. Chain four and turn so the wrong side is facing you. Skip two stitches, then work one slip stitch in the next stitch.
2. Chain one and turn so the right side is facing you. Work six single crochets in the loop or as many single crochet stitches needed to cover the loop. To continue, single crochet in the next stitch of the edge.
Tip: When shopping for buttons, be sure to bring the sweater directions, the picture of the sweater, and a ball or swatch of the yarn. It’s important to know the correct size and number of buttons you’ll need and to be able to choose the right color and style. The picture will give you a good idea how the buttons you choose will look on your finished sweater.
SEWING SUCCESS
For the average sweater that gets light wear, you can use the same yarn that was used to crochet the sweater for sewing on the buttons. Just be sure the yarn can go through the holes in the button. If it’s too thick, use matching sewing thread instead. To increase the strength of the thread, use the thread doubled in the needle and tie the ends together in a tight, secure knot. For metal buttons that can gnaw through yarn and regular sewing thread in no time, opt for carpet thread or even dental floss.
Buttons cause the most wear and tear on a garment, so it’s a good idea to add an extra bit of security in the form of a backup button; this is especially important for jackets that get the heaviest wear. When you buy your fashion buttons, also buy the same amount of shirt buttons in a color that matches the yarn. To attach a backup button, have the fashion button on the right side of the crocheted fabric and the shirt button behind it on the wrong side. Sew the two buttons together, going through the fabric and their corresponding holes. It’s important not to sew them too tightly together. Leave a little wiggle room so it will be easy to button and unbutton, and the fabric behind the fashion button can’t pucker.
Tip: Sew one or two spare buttons onto the gauge swatch in case you need replacements. Buttons (like yarn) can change color when washed, so wash the swatch along with the garment. Then not only will the yarn match, but the buttons will, too.
anchoring the thread
Knotted thread can pull through crocheted fabric, so use this neat little trick to secure it in place. Insert the double-threaded needle into the fabric from front to back to front again. Now insert the needle between the threads at the knotted end, as shown, then pull the needle to take in the slack. Trim the excess thread close to the knot.