Now that you’ve been introduced to your crochet tools, you’ll need to learn what to do with them. This section will teach you the correct ways to hold your hook and work the yarn. Before you know it, you’ll be crocheting!
WHAT YOU’LL NEED
The best size crochet hook to start with is an H/8 (5mm) that is made of aluminum. This size is comfortable to hold in your hand, making the movements of crocheting easier than using a very small or very large hook.
To work with a size H/8 (5mm) hook, you will need 4-ply knitting worsted weight yarn. You can opt for a synthetic fiber such as acrylic, a natural fiber such as wool, or one that is a blend like wool and nylon. For your first time out it’s best to stay away from cotton, which is not as easy to crochet with as those just mentioned because it doesn’t have a lot of elasticity. Choose a solid color that you like, but keep your choice light in tone. Keep in mind that stitches made using dark colors, like black and navy, are harder to see.
HANDS-ON KNOW-HOW
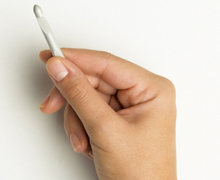
There are two ways you can hold a crochet hook. The first, and recommended, grip is like a knife.
Position the hook in your hand so your thumb is flat on the front of the grip, your index finger is flat on the back of the grip, and the hook (tip and throat) is facing you. Secure the handle by wrapping your remaining fingers around it. It should feel comfortable in your hand. Practice the hold by putting the hook down, then picking it up again, positioning the hook as described, until it feels like second nature to you.
The second hold is like a pencil. Although you have the freedom to choose which way is more comfortable for you, doctors have recently discovered that holding the hook like a pencil may cause carpal tunnel syndrome; that’s why it’s best to go with the knife hold.
holding a crochet hook
1. The first and recommended grip is like a knife.
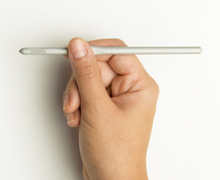
2. The second hold is like a pencil.
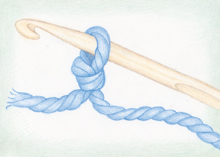
SLIP KNOT
The slip knot is simply a way of tying the end of the yarn to create a loop that can be adjusted to fit the size of the crochet hook. This important little loop anchors the yarn to the hook so you can make a chain and then crochet stitches.
making a slip knot
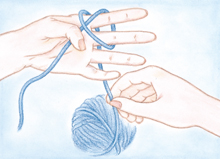
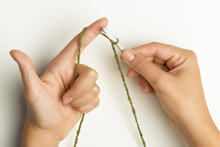
1. Reel off about a yard/meter of yarn from the ball. Hold the yarn in your palm with your thumb about 6″/15cm from the end. Using the yarn coming from the ball, wrap the yarn twice around your index and middle fingers.
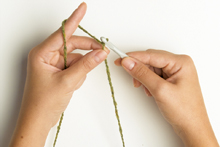
2. Pull the strand coming from the ball through the loop between your two fingers, forming a new loop.
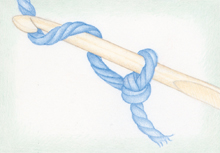
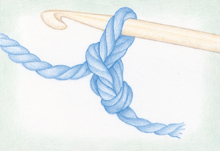
3. Place this new loop on the hook. Firm up the knot by pulling on the free end of the yarn. Now adjust the size of the loop by pulling on the yarn coming from the ball until it fits the hook but slides easily on the shaft.
HOLD ON
Before you make your first chain, it’s time to learn how to hold the yarn in conjunction with holding the crochet hook. The hardest thing to remember here is to relax and breathe! The tighter you hold the yarn and hook, the harder it will be to work. It’s all going to seem awkward at first, but try not to get frustrated. Soon it will become second nature to you—with a little practice.
holding the yarn
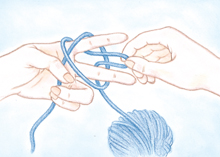
1. Hold the hook, with the slip knot attached, in your hand, making sure the free end of the yarn is hanging down. Now hold the yarn coming from the ball in your other hand so the yarn goes halfway around your index finger (about 1½”/4cm from the base of the slip knot), then anchor the yarn with your pinky.
2. Secure the free end that’s hanging down by holding the base of the slip knot between your thumb and middle finger. Now you’re ready to make a chain!
FOUNDATION CHAIN
The foundation chain is the base for making all the crochet stitches you’ll be learning how to do. It is simply a series of loops (called chain stitches) that are linked together. It’s in these chain stitches that you will make the crochet stitches.
There are four important things to remember as you make a foundation chain:
1. It’s all in the wrists. As you work, your arms should stay comfortably at your sides allowing your wrists to do most of the actions.
2. For each chain stitch, you’ll be using about 1″/2.5cm worth of yarn, so let the yarn coming from the ball slide smoothly from under your pinkie and over your index finger every time you make a stitch. Don’t forget that your index finger should always be about ½”/4cm from the tip of the crochet hook.
3. Every time you’ve made four or five chain stitches, move your thumb and middle finger up and resecure the foundation chain by holding the last chain stitch made between these two fingers. Remember that your thumb and middle finger should never be more than ½”/4cm from the tip of the crochet hook.
4. Stay relaxed and don’t sweat it! If you make a mistake, simply start over.
making a foundation chain
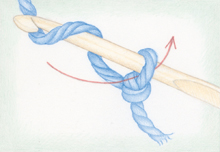
1. To make each chain stitch, you need to wrap the yarn over the hook from the back to the front. To do this, keep your index finger straight and twist your wrist toward you. At the same time, twist your other wrist away from you to bring the yarn in front of the hook. Now twist both wrists back to their original positions. The yarn will now be caught under the hook. This is called a yarn over.
2. To draw the yarn through the loop on the hook, first twist your wrist toward you so the hook is facing down. Now pull the yarn through the loop, then twist your wrist back to its original position so the hook is facing you again. You have now made one chain stitch.
3. You might have to adjust the size of the loop on the hook so it slides easily and slightly loosely along the shaft. To make it larger, use the hook to pull up on the loop while allowing the extra yarn needed to feed off your index finger. To make it smaller, use your index finger to pull on the yarn until the loop is the right size. Continue to make chain stitches, adjusting the loop on the hook as you go so all the chain stitches are the same size.