So you’re cruising along doing about 120 sph (stitches per hour) when you have to come to a grinding halt because you’ve finished the first ball of yarn! Don’t fret—it’s easy to get going again by joining a new ball of yarn. Whenever you can, join the new yarn at the end of a row. This is especially important when you are crocheting an openwork or lacy pattern stitch where you have no place to weave in the yarn ends invisibly. Joining at the side might mean you’ll have to cut off some of the yarn from the previous ball, but you can always use it for sewing, adding a fringe or making a tassel. If the pattern stitch is not openwork and you find you just have to join mid-row, carefully check the tension of the affected stitches to make sure they are neither too tight nor too loose.
joining yarn
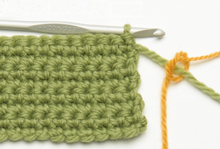
1. To join a new ball yarn at the side edge, tie it loosely around the old yarn, leaving at least a 6″/15cm tail. Untie the knot later and weave the ends into the seam.
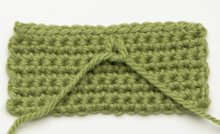
2. Before joining the new yarn mid-row, complete the last stitch that you were working on. Tie the old and new ends together loosely close to the last stitch; yarn tails should be at least 6″/15cm long. Later, untie the knot and weave the ends under the stitches.
JOINING NEW YARN COLOR
Stripes are the easiest way to create a multicolor garment, even for the beginner. But changing from one color to the next is not just a matter of tying ends together at the end of the row. The color change is actually made when you are working the last stitch of the row before, so when you chain and turn, the side edge of the next row will be entirely in the new color. How this is done varies slightly from single, half double, double, and treble crochet, but the end result will be the same.
joining new color
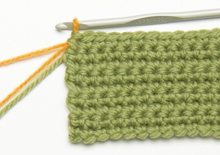
1. If you are working in single crochet, work across the row to within the last stitch. Insert the hook into the last stitch and draw up a loop. Working 6″/15cm from the end of the new color, draw the new color through both loops on the hook to complete the single crochet stitch.
2. Chain one and turn. Cut the old yarn leaving a 6″/15cm tail. Loosely tie the two tails together, close to the side edge, so stitches don’t unravel. Later, untie the knot and weave in the ends.
FOR HALF DOUBLE CROCHET
Work across the row to within the last stitch. Yarn over, insert the hook into the last stitch, and draw up a loop. Working 6″/15cm from the end of the new color, draw the new color through all three loops on the hook to complete the half double crochet stitch. Chain two and turn, then join yarns following Step 2.
FOR DOUBLE CROCHET
Work across the row to within the last stitch. Yarn over, insert the hook into the last stitch, and draw up a loop. Yarn over and draw through two loops on the hook. Working 6″/15cm from the end of the new color, draw the new color through the last two loops on the hook to complete the double crochet stitch. Chain three and turn, then join yarns following Step 2.
FOR TREBLE CROCHET
Work across the row to within the last stitch. Yarn over the hook twice, then insert the hook into the last stitch and draw up a loop. Yarn over and draw through two loops on the hook. Yarn over again and draw through two loops on the hook. Working 6″/15cm from the end of the new color, draw the new color through the last two loops on the hook to complete the treble crochet stitch. Chain four and turn, then join yarns following Step 2.
Weaving in Ends
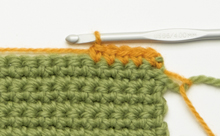
Each time you finish a ball of yarn and join a new one or change colors for a stripe pattern, you’ll find yourself with lots of loose ends. Weaving in these yarn ends is an important part of the finishing process, so it must be done properly in order to get the best end result. To do this, carefully untie the knot made when joining the new yarn. Thread one of the loose strands into a yarn needle and insert the needle down through the side edge for approximately ½”/4cm. Snip off the excess end, taking care not to cut into the crocheted fabric. To secure the second strand, thread the yarn needle with the end and weave it up the edge in the opposite direction. If you are dealing with ends from changing colors for a stripe, weave in each end along the edge of the same color. If you have changed yarns in the middle of a row, first make sure the knot is on the wrong side of the fabric. If it isn’t, push it through to the wrong side. Carefully untie the knot. Thread one loose end into a yarn needle. Weave the needle horizontally to the right for about three stitches. Before you pull the needle through, turn the work over to the right side to make sure you cannot see the needle; reweave the needle if necessary. Pull the needle through, taking care not to change the size or shape of the affected stitches. To secure, take one small backstitch, then continue to weave the needle through approximately three more stitches. Pull on the end to embed the backstitch into the fabric, flatten the fabric if it has puckered, then snip off the excess yarn end. Repeat with the remaining loose end, but weave it horizontally to the left.Tip: Don’t throw away even the smallest snippet of yarn. When your project is completed, put the scraps outside for birds to use as nesting material. Just leave them in the middle of your lawn or a similar spot, and they’ll fly right in and take them away.