Learning about crochet is like immersing yourself in a foreign culture where another language is spoken and written, and where there are unfamiliar rules and customs. It can be a little intimidating and a tad frustrating at times, but the payoff is big and totally worthwhile. So continue to follow along as we explain what you’ll need to know before you make your very first project!
GAUGE
The longest journey begins with the first step, and knowing the meaning and importance of gauge is your first step to crocheting a garment that comes out the correct size. Every pattern direction will have a recommended gauge, plus finished measurements. The gauge is how many stitches and rows you should get over a span of inches/centimeters (usually a 4″/10cm square) when you work in the specified pattern stitch, using the yarn and crochet hook size called for in the materials list. The amount of stitches to the inch/centimeter (or gauge) dictates how many stitches will be crocheted to achieve the finished measurements.
The second step is making a gauge swatch, which enables you to make sure you get the recommended gauge before you begin your project. While the gauge is based on a 4″/10cm square, you should make a swatch that’s at least a 5″/12.5cm square to be better able to measure accurately. Gather up the same yarn and crochet hook size that is called for in the directions. Crochet enough chain stitches for a 5″/12.5cm-wide swatch, then work in the pattern stitch specified in the directions for 5″/12.5cm. Do not fasten off. Place the swatch on a hard, flat surface. For stitches across, place a ruler, tape measure or stitch gauge horizontally on the swatch. Position the 1″/2.5cm mark even with a whole stitch, then working toward, the right count 4″/10cm worth of stitches (don’t forget fractions of stitches). If you have more stitches to the inch/centimeter than is recommended, remake the swatch using a hook that’s one size larger. If you have fewer stitches than is stated, try again with a smaller hook.
Once you have achieved the recommended gauge, it’s time to begin your project! But you’ll still want to recheck your gauge once you have crocheted about 5″/12.5cm of work. Just as before, place the piece on a flat surface and measure the total width to see if it matches the width stated in the finished measurements. If it does, you’re good to go, but if it doesn’t you’ll have to change your hook size. “But why isn’t it the right size?” you might ask. This is because sometimes you might crochet looser or tighter (this is called the tension) when you work across a larger piece of fabric. If you find that you have to change the hook size to get the right gauge, you’ll have to unravel all the rows and start again using one size larger hook (if it’s too small) or one size smaller hook (if it’s too large). This might seem heartbreaking and discouraging, but just imagine how you’d feel when after spending hours to complete the piece you discover that the size is all wrong.
gauge
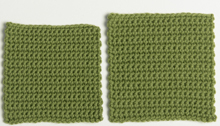
If you think that making a gauge swatch is unnecessary, think again! Each one of these single crochet gauge swatches was made using the same yarn and have the exact same amount of stitches and rows. The swatch on the left was made using a hook that was only one size smaller than the swatch on the right. Just imagine how this would impact the overall size of a sweater. We hope this convinces you not to take shortcuts!
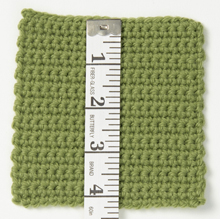
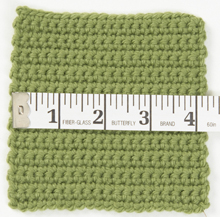
measuring gauge
You can measure your gauge swatch using a ruler, as the first two squares show. Or you can use a stitch gauge in the center of your swatch and count the stitches and rows inside the 2″/5cm right-angle opening (as shown in the third square).

Tip: Don’t be influenced by other crocheters who say they never bother making a gauge swatch. Just keep in mind that professional crochet designers—those creative artists who design the projects that you will be making and wearing—have to make a gauge swatch before they are able to calculate all numbers of stitches and rows needed to form a garment. In order for you to get the same results as the picture of the sweater that you fell in love with, you’ll have to match their gauge, stitch for stitch and row for row.
ABBREVIATIONS AND TERMS
The first time you look at the directions for a crochet pattern stitch or directions for a project, you may think it’s written in a foreign language. But on second glance you’ll begin to see recognizable words emerging, no matter how much they’ve been shortened. Why condense words and phrases? Well, consider if everything were written out in whole words and sentences; directions that would normally fit on one page now become a whole book! It’s actually easier to learn the language of crochet than to wade through pages and pages of directions. Here’s a list of abbreviations and terms that you’ll encounter as you continue to explore crochet.
approx: approximately
beg: begin, beginning
[ ]: Repeat the directions inside the brackets as many times as indicated.
ch: chain, chains
cont: continue, continuing
CC: contrasting color
dec: decrease, decreasing
dc: double crochet (UK: tr—treble)
hdc: half double crochet (UK: htr—half treble)
inc: increase, increasing
lp/lps: loop/loops
MC: main color
mm: millimeter, millimeters
oz/g: ounces/grams. This usually refers to the amount of yarn in a single skein, ball or hank of yarn.
( ): Work the directions contained inside the parentheses into the stitch indicated. See “Small (Medium, Large),” at right, for the other uses of parentheses.
pat/pats: pattern, patterns
rem: remain, remains or remaining
rep: repeat, repeating
rep from *: Repeat the directions following the asterisk as many times as indicated. If the directions say “rep from * to end,” continue to repeat the directions after the asterisk to the end of the row.
rev sc: reverse single crochet
reverse shaping: A term used for garments such as cardigans, where shaping for the right and left fronts is identical but reversed. For example, neck edge stitches that were decreased at the beginning of the row for the first piece will be decreased at the end of the row on the second piece. In general, follow the directions for the first piece, making sure to mirror the decreases (and/or increases) on each side.
RS: right side; right sides
rnd/rnds: round/rounds
sc: single crochet (UK: dc—double crochet)
sk: skip, skipping
sl: slip, slipping
sl st: slip stitch (UK: sc—single crochet)
Small (Medium, Large): The most common method of displaying changes in a pattern for different sizes. In general, stitch counts, measurements, etc., for the smallest size come first, followed by the larger sizes in parentheses. If there is only one number given, it applies to all of the sizes.
sp/sps: space/spaces
st/sts: stitch/stitches
t-ch: turning chain
tog: together
tr: treble crochet (UK: dtr—double treble)
work even: Continue in the established pattern without working any increases or decreases.
WS: wrong side, wrong sides
yd/m: yard(s)/meter(s)
yo: yarn over
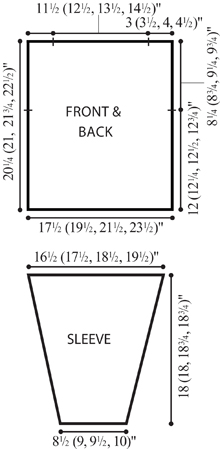
Understanding Schematics
Although these little drawings look like sewing patterns for a fashion doll, they are actually drawn-to-scale outlines of what each piece of a sweater should look like and measure after it has been crocheted. Called schematics, they are essential to your decision-making and the ultimate success of a project. When you are considering making a sweater, look at the schematics first. Simple outlines, such as those shown here, usually mean it’s a beginner-level project because there is no shaping on the front and back and the sleeve is pretty straightforward. Generally the more shaping involved—like a tapered waist, V-neck and slanted shoulders—the more advanced the project. Also consider the style; maybe you don’t like how dropped shoulders look on you.
Each main piece of the sweater will be shown as a separate schematic; pieces like pockets are not shown unless they are shaped. Note here that the front and the back are shown as one or, more accurately, one is superimposed on the other. This is usually the case, except when the front and back are drastically different in size and shape. For a cardigan, only one front will be represented, except, of course, when the left front is different than the right.
So what are all these numbers? All schematics will have the same general information as shown. For the front and back: bottom width/bust measurement, length to armhole, armhole depth, shoulder width, neck width, and total length from bottom edge to top. For the sleeve: cuff width, total length from bottom edge to top edge, and width of top edge. Keep in mind that if there is other shaping, like a V-neck, the measurements for the depth (where you begin and end) will be shown as well. When reading the numbers, the smallest size is listed first, before the parentheses, and each larger size will be inside the parentheses in sequential order.
Tip: To avoid confusion, and perhaps making a mistake, use a yellow marker on the schematics to highlight the measurements that pertain to the size you are making.