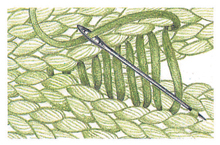
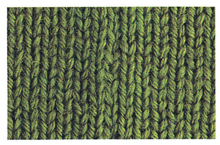
60 NEW PATTERNS AVAILABLE NOW!

Finishing

These final steps can be the most important of the knitting process. Once you’ve finished creating the body of your piece, you’ll need to tie up loose ends and make sure all elements are working together in harmony. These finishing techniques will ensure that your garment looks lovingly handmade rather than like a homemade mess.

Weaving in Ends

Every time you finish a ball of yarn and join a new one or change colors in the middle of a stripe pattern, you’ll find yourself with loose ends. In order to tuck in these stragglers and create a truly finished-looking product, you must weave them into the wrong side of the knitted fabric.

To do this, carefully untie the knot you made when joining new yarn. Thread one of the loose strands through a yarn needle and snake the needle (and attached yarn) down through approximately five of the free loops along the edge of your knitting. Snip close to the work to remove whatever’s left, being very careful not to cut into the actual knitting. To secure the second strand, thread it through the yarn needle and weave up.

If you have to change yarns in the middle of a row, untie the knot and weave one loose piece in each horizontal direction, following the path of the affected stitch through five or six additional stitches on the wrong side of the work. Always double check the right side of the fabric to make sure there is no puckering or unsightly looseness where the ends began

Blocking

Like making a gauge swatch, blocking is one of those essential steps that knitters tend to roll their eyes at. It may not be as much fun as choosing colors and textures, and it certainly does not have the meditative rhythm of stitching, but without blocking, your perfectly knit garment will look sloppy. So, please, pull out that blocking equipment and follow along as we teach you the ins and outs (and ups and downs) of molding your knitted pieces into shape. There are two main categories of blocking: wet and steam. To know which one to use with your particular yarn, consult the pressing guide below. Before beginning either method, gather up any schematics or measurements from the pattern, and use them like architect’s plans to know exactly how far the pieces should stretch and where they should dip and swell.

Wet Blocking

With wet blocking, you can either immerse the knitted pieces in cool water, squeeze them out and stretch them to their exact measurements on a flat board, or you can pin the pieces first and then wet them down with a water-filled spray bottle. Which method you choose is largely a matter of personal preference, though you may find the spraying method to be a bit less cumbersome. Once the pieces are wet, walk away and don’t fuss with them again until they are completely dry. This may take 24 hours or more, so be patient.

Steam Blocking

To block with steam, first pin the pieces on a flat surface according to the schematics. Fire up your steam iron or handheld steamer, and when it’s nice and steamy, hold the iron close to the fabric until the fabric is convincingly damp. DO NOT touch the iron to the stitches; if you must lightly press, protect your knitted project by sandwiching a colorfast towel or pressing cloth between the fabric and the hot metal. As with wet blocking, leave the pieces to dry. Drying after steaming probably won’t take as long as after wet blocking, but you may still need to be patient for hours on end. In the meantime you can be dreaming up the particulars of your next sweater!

BLOCKING SUPPLIES
1. Flat, covered, padded surface large enough to hold one piece of knitting (e.g. carpet or bed covered with plastic and a towel)
2. Rust-proof T-pins (NOT pins with little plastic colored heads—these will melt during steam blocking, creating a huge mess)
3. Tape measure
4. Spray bottle with cool water (or basin full of cool water) or steam iron (or handheld steamer)
5. Towels (be sure they’re colorfast)
6. Pressing cloth

pinning and blocking

Blocking 1.

1. Pin the key areas as shown.
Blocking 2.

2. Pin the piece evenly, omitting the ribbing.

pressing guide

Because fibers react differently to heat, it is best to know what to expect before you press or steam them. Just remember that there are many combinations of fibers, and you should choose a process that is compatible with all the components of your yarn. If you are unsure about the fiber content of your yarn, test your gauge swatch before blocking your sweater pieces.

Angora Wet block by spraying.
Cotton Wet block or warm/hot steam press.
Linen Wet block or warm/hot steam press.
Lurex Do not block.
Mohair Wet block by spraying.
Novelties Do not block.
Synthetics Carefully follow instructions on ball band—usually wet block by spraying; do not press.
Wool and all wool-like fibers (alpaca, camel hair, cashmere) Wet block by spraying or warm steam press.
Wool blends Wet block by spraying; do not press unless tested.

Seaming

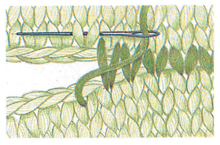
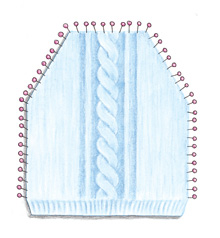
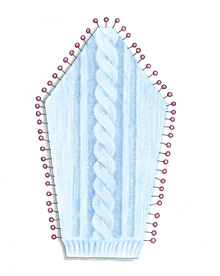
Once you’ve finished off the last strand of every piece of your garment, there’s one thing left to do in order to make those pieces into something you can wear: sewing them together. In knitting, this process is generally called “seaming,” and is accomplished with a yarn needle and the same yarn you used to make your project. There are many ways to sew together knitted fabric, and each version serves a different purpose. For example, you use one kind of seaming to join adjacent lengths of stockinette stitch and another to connect vertical and horizontal pieces of the same fabric. Before you pick up that needle and thread and start joining little stitches at the hip, you have to make sure you line them up correctly. To start, find the cast-on stitches on both sides. Pin them together with a straight pin or safety pin. Now count up ten rows on each side and pin the corresponding stitches together. Continue in this manner until you get to the top of the two pieces. With a project like a hat, which is worked all in one piece, the rows should line up exactly. If you end up with extra rows on one side at the top, go back and see where they might have sneaked in on the opposite side. When seaming two separate pieces, you may have to ease in extra rows if one piece happens to be slightly longer than the other.

How to begin seaming

How to Begin Seaming
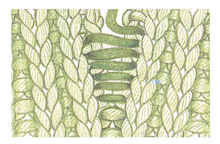
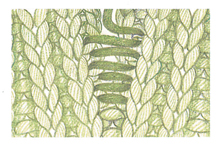
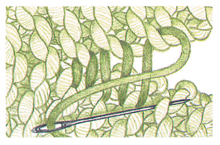
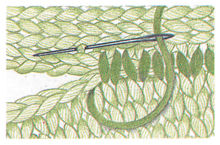
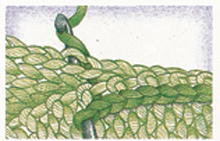
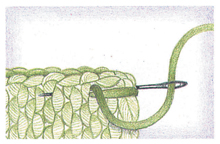
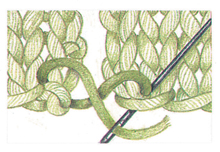
If you have left a long tail from your cast-on row, you can use this strand to begin sewing. To make a neat join at the lower edge with no gap, use the technique shown here.

Thread the strand into a yarn needle. With the right sides of both pieces facing you, insert the yarn needle from back to front into the corner stitch of the piece without the tail. Making a figure eight with the yarn, insert the needle from back to front into the stitch with the cast-on tail. Tighten to close the gap.

vertical seam on stockinette stitch

The invisible vertical seam is worked from the right side and is used to join two edges row by row. It hides the uneven selvage stitches at the edge of a row and creates an invisible seam, making it appear that the knitting is continuous.
Vertical Seam
The finished vertical seam on stockinette stitch.
Vertical Seam 2

Insert the yarn needle under the horizontal bar between the first and second stitches. Insert the needle into the corresponding bar on the other piece. Continue alternating from side to side.

vertical seam on ribbing

The invisible vertical seam is worked from the right side and is used to join two edges row by row. It hides the uneven selvage stitches at the edge of a row and creates an invisible seam, making it appear that the knitting is continuous.
vertical seam on ribbing

Purl to Purl
When joining ribbing with a purl stitch at each edge, insert the yarn needle under the horizontal bar in the center of a knit stitch on each side in order to keep the pattern continuous.

vertical seam on ribbing

Knit to Knit
When joining ribbing with a knit stitch at each edge, use the bottom loop of the purl stitch on one side and the top loop of the corresponding purl stitch on the other side.

vertical seam on ribbing

Purl to Knit
When joining purl and knit stitch edges, skip the knit stitch and join two purl stitches as at left.

Vertical seam on garter stitch

This invisible seam joins two edges row by row like vertical seaming on stockinette stitch. The alternating pattern of catching top and bottom loops of the stitches makes it so that only you can tell there’s a join.

vertical seam on garter stitch
Insert the yarn needle into the top loop on one side, then in the bottom loop of the corresponding stitch on the other side. Continue to alternate in this way.

Horizontal seam on stockinette stitch

This seam is used to join two bound-off edges, such as shoulder seams, and is worked stitch by stitch. You must have the same number of stitches on each piece. Pull the yarn tight enough to hide the bound-off edges. The finished seam resembles a row of knit stitches.

horizontal seam on stockinette stitch

The finished horizontal seam on stockinette stitch.

horizontal seam on stockinette stitch

With the bound-off edges together, lined up stitch for stitch, insert the yarn needle under a stitch inside the bound-off edge of one side and then under the corresponding stitch on the other side.

vertical to horizontal seam

This seam is used to join bound-off stitches to rows, as in sewing the top of a sleeve to an armhole edge. Since there are usually more rows per inch (2.5cm) than stitches, occasionally pick up two horizontal bars on the piece with rows for every stitch on the bound-off piece.
vertical to horizontal seam

The finished vertical to horizontal seam on stockinette stitch.

vertical to horizontal seam

Insert the yarn needle under a stitch inside the bound-off edge of the vertical piece. Insert the needle under one or two horizontal bars between the first and second stitches of the horizontal piece.

slip stitch crochet seam

This method creates a visible, though very strong, seam. Use it when you don’t mind a bulky join or are looking for an especially sturdy connection.

slip stitch crochet seam

With the right sides together, insert the crochet hook through both thicknesses. Catch the yarn and draw a loop through. *Insert the hook again. Draw a loop through both thicknesses and the loop on the hook. Repeat from the *, keeping the stitches straight and even.

backstitch

This is a strong seam that is worked from the wrong side and creates a seam allowance. Because it is not worked at the edge of the fabric, it can be used to take in fullness. The seam allowance should not exceed 3/8″/1cm.

backstitch
The finished backstitch on stockinette stitch.
backstitch
1. With the right sides of the pieces facing each other, secure the seam by taking the needle twice around the edges from back to front. Bring the needle up about ¼”/.5cm from where the yarn last emerged, as shown.
backstitch
2. In one motion, insert the needle into the point where the yarn emerged from the previous stitch and back up approximately ¼”/.5cm ahead of the emerging yarn. Pull the yarn through. Repeat this step, keeping the stitches straight and even.