The first step in garment making, and possibly the most important step of all, is making the gauge swatch. The gauge swatch is basically just a square piece of knitted fabric that demonstrates how you, the needles and the yarn interact before you get going on the main project. All patterns give a recommended gauge, or stitches and rows per inch, at the beginning of their instructions, usually directly below the suggestions for yarn weight and needle size.
In order to make the gauge swatch, gather up the exact yarn and needles that you plan to use for your project (even small differences like yarn color and needle brand can affect your gauge!). Cast on a number of stitches that will give you at least four inches across, and then work in stockinette stitch or the specified stitch pattern until you have made a bit more than four vertical inches of fabric.
At this point, simply remove the needle from the stitches (without binding off) and place the sample on a flat, smooth surface like a hardwood floor or kitchen table. Using a tape measure, ruler or stitch gauge, measure across four inches of the knitting in both directions and count the number of stitches within those four inches (don’t forget fractions of stitches). If you have more stitches to the inch than the pattern recommends, go up one needle size. If you have fewer stitches than is desirable, try again with a smaller needle.
Once you get as close as possible to the recommended gauge, go ahead and start knitting your garment, but don’t forget about gauge altogether just yet. Sometimes the gauge of your swatch may differ from the gauge that results when you cast on all of the stitches required for your garment. After you’ve worked about 5″/12cm of the first piece of your project, recheck your gauge by laying the piece down on a flat surface and pulling out your tape measure (or stitch gauge) again. Your knitting should be just as close to the recommended gauge as it was before, but in the event that it’s not, you’ll have to unravel what you’ve done and start again using a different needle size. As you rip out the rows and roll the yarn back into a ball, know two things: one, that you’ll be glad you did when your sweater fits, and two, that you have our condolences.
Tip: Make your gauge swatch easier to work with by including selvage stitches on the edges of the square. These not only help the piece of fabric lay nice and flat, but also simplify the process of measuring by giving you definite edges between which to measure. To make selvage stitches, work two rows of garter stitch (knit every row) at the top and bottom of the swatch and include two stitches on the beginning and end of each stockinette row that are garter stitch as well.
Gauge
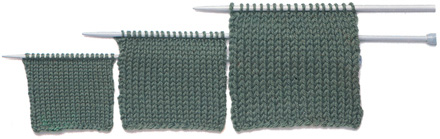
See the importance of making a gauge swatch with these three squares of knitting. Each is made with the same exact number of stitches and rows, but the one on the left uses a needle one size smaller than the middle square and two sizes smaller than the swatch on the right. Does this inspire you to make a gauge swatch before starting a whole garment? We hope so!
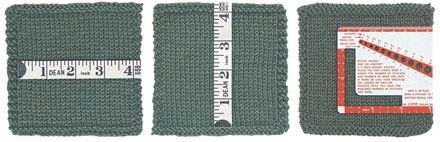
Measuring Gauge
You can measure your gauge swatch between selvage stitches using a tape measure, as the first two squares show. Or you can use a stitch gauge in the center of your swatch and count the stitches and rows inside the 2″/5cm right-angle opening, as shown in the third square.
Tip: Most knitters mistakenly think that making the gauge swatch is an extra, unnecessary step that can be avoided altogether. If there’s one piece of advice we hope you’ll remember, it’s this: always, always, always make a gauge swatch! If your knitting is so much as a half of an inch off from the recommended gauge, you can end up with a HUGE difference in the size of your finished garment. Take it from us that there’s nothing quite as frustrating as working tirelessly on an adult’s hat that ends up being the size of a toddler’s or making a baby’s hat that would fit best on a gorilla.