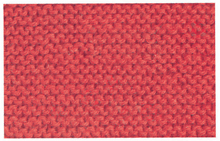
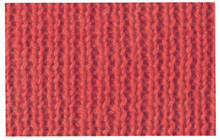
This is the most basic of all stitch patterns and is achieved by knitting every row. The end result is a flat, reversible, ridged fabric that stands up well to wear and does not roll at the edges. Here’s how to do it: When you get to the end of your first row of knit stitches, transfer the full needle to your left hand and start the process of knitting each stitch all over again. After several rows you’ll begin to see the fruits of your labor, and in time your growing strip of garter stitch will start to look like a real piece of knitted fabric.
Garter Stitch
Cast on any number of stitches. Knit every row.
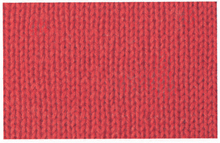
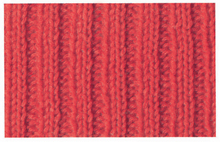
Stockinette Stitch
Now that you’ve learned how to knit and purl, you can finally put them together to make stockinette stitch, the V-patterned fabric that people most often associate with knitting. Unlike garter stitch (which appears ridged and does not roll), stockinette stitch has a much smoother appearance and a tendency to curl at the edges. Many designers use this inclination to their advantage, creating everything from rolled necks and cuffs to rolled edges of handbags and scarves.
Stockinette Stitch st st
Cast on any number of stitches. Row 1 (right side) Knit. Row 2 Purl. Repeat rows 1 and 2.
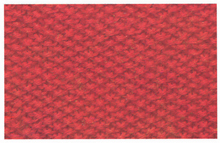
BASIC RIBBING
Alternating entire rows of knit and purl stitches creates the well-known stockinette stitch, but it’s also possible to switch back and forth within the same row to produce numerous different patterns. Of all the knit/purl stitch patterns you will learn, ribbing is definitely the most widely used. Because of its stretchiness and ability to “bounce” back into place, ribbing makes up the hems, necks and cuffs of most sweaters. Many sweaters even use ribbing throughout the garment to create a slim, body-hugging effect.
One of the nice things about ribbing (besides its elasticity) is that after the first row or two you can put down the instructions and let the stitches show you what comes next. When the stitch you’re about to work looks like a V, knit it. When it looks like a bump, purl it.
The trickiest part about ribbing for beginners is remembering to move the yarn back and forth when working the different stitches. For example, in two-by-two ribbing, you knit two stitches, move the yarn between the two needles to the front of the work and then purl two stitches. When you are ready to knit again, return the yarn to the back of the work by passing it between the two needles, then continue with your pattern. If you don’t move the yarn from back to front and front to back between knit and purl stitches, you will end up with extra stitches on your needle and a rectangular piece that quickly begins to resemble a triangle.
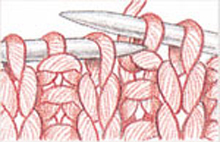
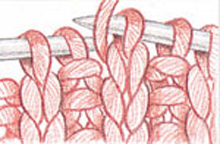
Moving Yarn Back and Forth
When knitting a stitch, the yarn is always held at the back of the work. When purling a stitch, the yarn is always at the front. In ribbing, when you change from a knit to a purl stitch, you must be sure the yarn is in the correct position to work the next stitch. When you are moving the yarn from the back to the front, or vice versa, the yarn should go between the two needles, not over them.
knitwise
purlwise
knit one, purl one (K1, P1) ribbing
k1p1 rib Cast on an odd number of stitches. Row 1 (right side) Knit one, *purl one, knit one; repeat from * to end. Row 2 Purl one, *knit one, purl one; repeat from * to end. Repeat rows 1 and 2.
knit two, purl two (K2, P2) ribbing
Cast on a multiple of 4 stitches plus 2 extra. Row 1 (right side) Knit two, *purl two, knit two; repeat from * to end. Row 2 Purl two, knit two, purl two; repeat from * to end. Repeat rows 1 and 2.
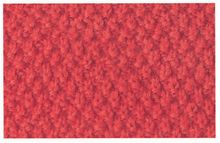
SEED STITCH
Seed stitch is a textured stitch created by working a sequence of knit and purl stitches, usually alternated on every row. Unlike ribbing, you knit the purl stitches and purl the knit stitches.
seed stitch
Row 1 (right side) *Knit one, purl one; repeat from * to end. Row 2 *Purl one, knit one; repeat from * to end. Repeat rows 1 and 2.
double seed stitch
Cast on an even number of stitches. Row 1 (right side) *Knit one, purl one; repeat from * to end. Row 2 Repeat row 1. Row 3 *Purl one, knit one; repeat from * to end. Row 4 Repeat row 3. Repeat rows 1 through 4.